混合开发
Flutter和native混合开发
Binding to native C/C++ code using dart:ffi
Writing custom platform-specific code
Writing custom platform-specific code
Flutter’s platform-specific API support does not rely on code generation, but rather on a flexible message passing style:
- The Flutter portion of the app sends messages to its host, the iOS or Android portion of the app, over a platform channel.
static const platform = const MethodChannel('samples.flutter.dev/battery');
    try {
      final int result = await platform.invokeMethod('getBatteryLevel');
      batteryLevel = 'Battery level at $result % .';
    } on PlatformException catch (e) {
      batteryLevel = "Failed to get battery level: '${e.message}'.";
    }
- The host listens on the platform channel, and receives the message. It then calls into any number of platform-specific APIs—using the native programming language—and sends a response back to the client, the Flutter portion of the app.
class MainActivity() : FlutterActivity() {
  private val CHANNEL = "samples.flutter.dev/battery"

  override fun onCreate(savedInstanceState: Bundle?) {
    super.onCreate(savedInstanceState)

    GeneratedPluginRegistrant.registerWith(this)
    MethodChannel(flutterView, CHANNEL).setMethodCallHandler { call, result ->
      // Note: this method is invoked on the main thread.
      if (call.method == "getBatteryLevel") {
        val batteryLevel = getBatteryLevel()//android平台api调用获取
        if (batteryLevel != -1) {
          result.success(batteryLevel)
        } else {
          result.error("UNAVAILABLE", "Battery level not available.", null)
        }
      } else {
        result.notImplemented()
      }
    }
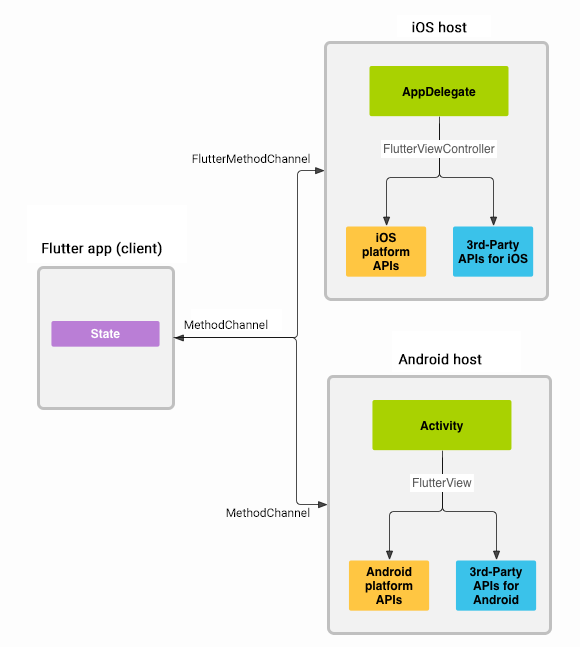
Messages and responses are passed asynchronously, to ensure the user interface remains responsive.
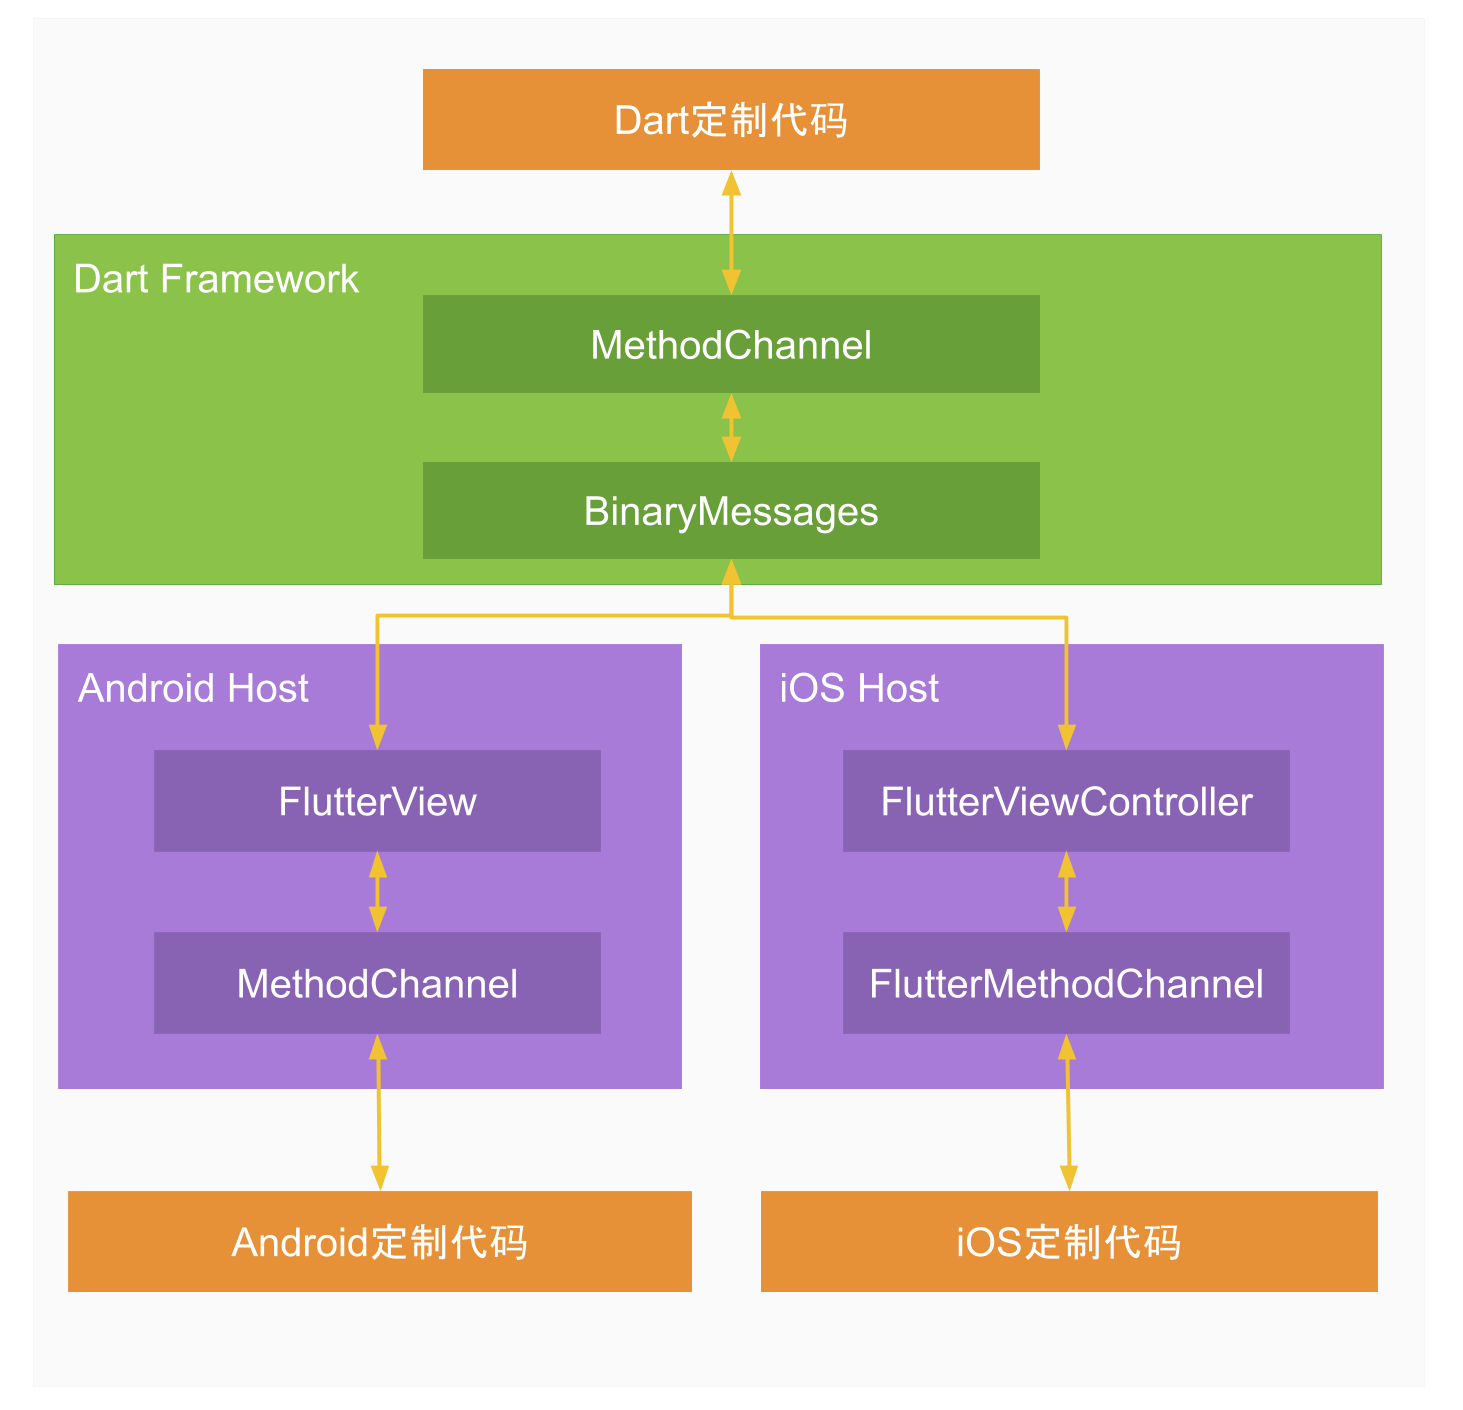
Platform Channel用于Flutter与Native之间的消息传递,整个过程的消息与响应是异步执行,不会阻塞用户界面。Flutter引擎框架已完成桥接的通道,这样开发者只需在Native层编写定制的Android/iOS代码,即可在Dart代码中直接调用,这也就是Flutter Plugin插件的一种形式。
Separate platform-specific code from UI code
If you expect to use your platform-specific code in multiple Flutter apps, it can be useful to separate the code into a platform plugin located in a directory outside your main application. See developing packages for details.
Publish platform-specific code as a package
To share your platform-specific code with other developers in the Flutter ecosystem, see publishing packages.
google官方混合开发方案
https://github.com/flutter/flutter/wiki/Add-Flutter-to-existing-apps
原生和Flutter交互
//从安卓原生页面跳转到FlutterDemoActivity页面使用如下方法将routeName传递过去:
Intent intent = new Intent(this, FlutterDemoActivity.class);
Bundle bundle = new Bundle();
bundle.putString("routeName", "first");
intent.putExtras(bundle);
startActivity(intent);

//flutter_host_android工程的java源码包下新建一个FlutterDemoActivity类,onCreate方法中的实现如下:
public static final String CHANNEL_NAME = "com.flutterbus/demo";
    @Override
    protected void onCreate(@Nullable Bundle savedInstanceState) {
        super.onCreate(savedInstanceState);

        // 获取由上一个页面传过来的routeName
        String routeName = "";
        Intent intent = getIntent();
        if (intent != null && intent.getExtras() != null) {
            routeName = intent.getExtras().getString("routeName");
        }

         // 根据指定routeName创建FlutterView用来展示对应dart中的Widget
        FlutterView flutterView = Flutter.createView(this, this.getLifecycle(), routeName);

        // 创建Platform Channel用来和Flutter层进行交互
        new MethodChannel(flutterView, CHANNEL_NAME).setMethodCallHandler(new MethodChannel.MethodCallHandler() {
            @Override
            public void onMethodCall(MethodCall methodCall, MethodChannel.Result result) {
                methodCall(methodCall, result);
            }
        });
        setContentView(flutterView);
    }

    /**
     * 处理dart层传来的方法调用
     */
    private void methodCall(MethodCall call, MethodChannel.Result result) {
        if (call.method.equals("gotoNativePage")) {
            startActivity(new Intent(this, NativeActivity.class));
            result.success(true);
        } else {
            result.notImplemented();
        }
    }

    //routeName在Flutter端是如何起到作用的呢,可以看下Flutter module中dart代码:
void main() => runApp(_widgetForRoute(window.defaultRouteName));

Widget _widgetForRoute(String route) {
  switch (route) {
    case 'first':
      return MyApp();
    case 'second':
      return MyApp();
    default:
      return Center(
        child: Text('Unknown route: $route', textDirection: TextDirection.ltr),
      );
  }
}
java中创建FlutterView时其实就是将routeName设置为window的defaultRouteName,这样在dart端运行的时候就会根据defaultRouteName来展示对应的Widget了。而上面java层我们定义了Platform Channel,这样Flutter端就可以在dart层通过MethodChannel传递消息给java层从而实现两端的交互。
static final String channelName = "com.flutterbus/demo";

Future<Null> jumpToNativePage() async {
    MethodChannel methodChannel = MethodChannel(channelName);
    await methodChannel.invokeMethod("gotoNativePage");
}
至此,安卓原生工程集成Flutter就完成了,后续我们想用Flutter实现UI界面都可以在Flutter module工程中编写,原生想跳转到指定Flutter页面设置好routeName即可,dart的main函数会根据routeName来跳转到不同的Widget。
总结
以上就是官方提供的混合开发方案了,这个方案有一个巨大的缺点,就是在原生和Flutter页面叠加跳转时内存不断增大,因为FlutterView和FlutterViewController每次跳转都会新建一个对象,从而Embedder层的AndroidShellHolder和FlutterEngine都会创建新对象,UI Thread、IO Thread、GPU Thread和Shell都创建新的对象,唯独共享的只有DartVM对象,但是RootIsolate也是独立的,所以Flutter页面之前的数据不能共享,这样就很难将一些全局性的公用数据保存在Flutter中,所以这套方案比较适合开发不带有共享数据的独立页面,但是页面又不能太多,因为创建的Flutter页面越多内存就会暴增,尤其是在iOS上还有内存泄露的问题。
Add-to-App
如果您想要体验 Add-to-App 功能,请参阅文档或浏览我们的示例项目,我们在这些项目中展示了多种集成场景。
Add-to-App 文档 https://flutter.dev/docs/development/add-to-app
https://flutter.dev/docs/development/add-to-app/android/project-setup
https://flutter.dev/docs/development/add-to-app/android/add-flutter-screen
示例项目 https://github.com/flutter/samples/tree/master/add_to_app
FlutterEngineCache
Note: To warm up a FlutterEngine, you must execute a Dart entrypoint. Keep in mind that the moment executeDartEntrypoint() is invoked, your Dart entrypoint method begins executing. If your Dart entrypoint invokes runApp() to run a Flutter app, then your Flutter app behaves as if it were running in a window of zero size until this FlutterEngine is attached to a FlutterActivity, FlutterFragment, or FlutterView. Make sure that your app behaves appropriately between the time you warm it up and the time you display Flutter content.
Note: When using a cached FlutterEngine, that FlutterEngine outlives any FlutterActivity or FlutterFragment that displays it. Keep in mind that Dart code begins executing as soon as you pre-warm the FlutterEngine, and continues executing after the destruction of your FlutterActivity/FlutterFragment. To stop executing and clear resources, obtain your FlutterEngine from the FlutterEngineCache and destroy the FlutterEngine with FlutterEngine.destroy().
Note: Runtime performance isn’t the only reason that you might pre-warm and cache a FlutterEngine. A pre-warmed FlutterEngine executes Dart code independent from a FlutterActivity, which allows such a FlutterEngine to be used to execute arbitrary Dart code at any moment. Non-UI application logic can be executed in a FlutterEngine, like networking and data caching, and in background behavior within a Service or elsewhere. When using a FlutterEngine to execute behavior in the background, be sure to adhere to all Android restrictions on background execution.
同一个engine内部切换具体显示内容的方式
By setting the initial route of the navigation channel, the associated FlutterEngine displays the desired route upon initial execution of the runApp() Dart function.
Changing the initial route property of the navigation channel after the initial execution of runApp() has no effect. ==Developers who would like to use the same FlutterEngine between different Activitys and Fragments and switch the route between those displays need to setup a method channel and explicitly instruct their Dart code to change Navigator routes.==
FlutterFragment
// With a new FlutterEngine.
val flutterFragment = FlutterFragment.withNewEngine()
    .initialRoute("myInitialRoute/")
    .build()
Note: FlutterFragment’s initial route property has no effect when a pre-warmed FlutterEngine is used because the pre-warmed FlutterEngine already chose an initial route. The initial route can be chosen explicitly when pre-warming a FlutterEngine.
FlutterFragment flutterFragment = FlutterFragment.withNewEngine()
    .dartEntrypoint("mySpecialEntrypoint")
    .build();
Note: FlutterFragment’s Dart entrypoint property has no effect when a pre-warmed FlutterEngine is used because the pre-warmed FlutterEngine already executed a Dart entrypoint. The Dart entrypoint can be chosen explicitly when pre-warming a FlutterEngine.
https://github.com/alibaba/flutter_boost
已开源|码上用它开始Flutter混合开发——FlutterBoost
flutterboost1.0到2.0,我一共做了这几件事…
FlutterBoost集成
- Demo同级目录创建一个Flutter module项目,取名为flutter_boost_module,将Flutter module项目引入集成到原生项目中,集成方式参考《Flutter混合开发专题一》
- Flutter module项目集成FlutterBoost,在flutter_boost_module项目的pubspec.yaml文件中添加依赖插件配置dependencies:flutter_boost: ^0.0.411,配置完成后执行flutter packages get命令下载依赖插件到本地
- 引入FlutterBoost的安卓工程代码了,在app目录下的build.gradle中添加以下项目依赖implementation project(':flutter_boost')
- Flutter module项目使用FlutterBoost,在main方法中运行的rootWidget中注册页面
@override
void initState() {
    super.initState();

    FlutterBoost.singleton.registerPageBuilders({
      'flutterbus://flutterFirstPage': (pageName, params, _) {
        print("first flutterPage params:$params");
        ...
        return FirstPage();
      },
      'flutterbus://flutterSecondPage': (pageName, params, _) {
        print("second flutterPage params:$params");
        ...
        return SecondPage();
      },
    });

    FlutterBoost.handleOnStartPage();
}

@override
Widget build(BuildContext context) {
    return MaterialApp(
        title: 'Flutter Boost example',
        builder: FlutterBoost.init(),
        home: Container());
}
- 安卓原生项目中使用FlutterBoost,Flutter引擎加载及FlutterBoostPlugin初始化
    public static void init(final Application app) {
        //此处必须启动初始化,主要是载入Flutter引擎文件
        FlutterMain.startInitialization(app);

        FlutterBoostPlugin.init(new IPlatform() {
            @Override
            public Application getApplication() {
                return app;
            }

            @Override
            public Activity getMainActivity() {
                return MainActivity.sRef.get();
            }

            @Override
            public boolean isDebug() {
                return true;
            }

            @Override
            public boolean startActivity(Context context, String url, int requestCode) {
                Debuger.log("startActivity url="+url);

                return PageRouter.openPageByUrl(context,url,requestCode);
            }

            @Override
            public Map getSettings() {
                return null;
            }
        });
    }
- Flutter页面对应Native容器,FlutterBoost初始化完成之后,针对Flutter中的页面我们需要在原生中创建对应的Native容器,即FlutterBoost中定义的Container,可以是Activity也可以是Fragment,这里我们使用Activity实现.
FlutterBoost已经为我们实现好了Activity类型的容器BoostFlutterActivity,该类实现了IFlutterViewContainer接口,我们自定义容器时只需要继承该Activity并实现三个方法即可,其中
-
getContainerName即是容器的名称,和Flutter层注册PageBuilder相对应;
-
getContainerParams为该容器需要传递给Flutter层对应Widget的参数,页面跳转接收的参数传递给Flutter页面就是在这里处理,需要将数据包装到Map中;
-
onRegisterPlugins是为该页面注册插件;
-
页面跳转路由
-
Native页面跳转Flutter页面
Native页面跳转Flutter页面其实就是打开一个Flutter页面对应的Native容器,我们可以根据路由来进行跳转操作
- Flutter页面跳转Native页面
我们只需要在Flutter端使用FlutterBoost提供的方法进行跳转即可,比如我需要从FirstWidget跳转到FirstNativeActivity页面,该页面对应的url为“flutterbus://nativeFirstPage”,我们可以执行以下代码
FlutterBoost.singleton.openPage("flutterbus://nativeFirstPage", {
                "query": {"description": "大家好,我来自First Flutter页面!!!!!!!!"}
              });
其中query对应的值是要传递给下一个页面的参数,不需要也可以不传。
- Flutter页面跳转Flutter页面,两种方式:
FlutterBoost
FlutterBoost.singleton.openPage("flutterbus://flutterSecondPage", {});
Navigator
Navigator.of(context).push(MaterialPageRoute(builder: (context){
                return SecondPage(enterType: 1,);
              }));
如果两种跳转方式混合使用会在页面返回时出现一定的问题,因为FlutterBoost提供了关闭当前页面的方法FlutterBoost.singleton.closePageForContext(context);,而使用Navigator跳转的话该方法是不起作用的,所以我们在Widget页面中定义了enterType来区分,默认使用FlutterBoost的跳转方式,如果使用Navigator跳转Flutter Widget页面,则需要传入enterType=1,这样在返回当前页面时使用如下方法进行处理
void exitPage(BuildContext context) {
    if (enterType == 0) {
      FlutterBoost.singleton.closePageForContext(context);
    } else {
      Navigator.pop(context);
    }
}
- 页面跳转的返回值问题